My agency: Unterschied zwischen den Versionen
(→Import/Export generic Setup) |
(→Import/export generic setup) |
||
| Zeile 237: | Zeile 237: | ||
== Import/export generic setup == | == Import/export generic setup == | ||
| + | (available with the next release, planed 15th October 15) | ||
A export and/or import from the agency generic setup of custom field definitions and custom publish actions in a XML schema file. | A export and/or import from the agency generic setup of custom field definitions and custom publish actions in a XML schema file. | ||
Version vom 14. Oktober 2015, 11:12 Uhr
Inhaltsverzeichnis
Section 'Address'
| Field | Description |
|---|---|
| Name | Name of Travel Agency |
| Street | Street of Travel Agency |
| PLZ | Postal code |
| Location | Location of Travel Agency |
| Country | Country where Travel Agency is located |
| Phone | Insert phone number of Travel Agency |
| URL | Insert the URL of the Travel Agency |
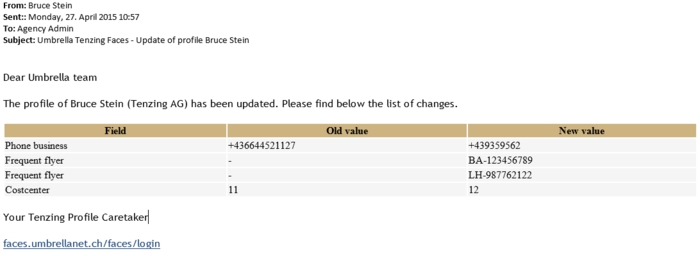
| Send profile updates to | This field indicates to which Email account an alert about an update or change will be sent. Emails would only be triggered if changes are executed by travellers or company admins.
If changes are done by the agency admin no email alert is send. In case of no email address is inserted, no alert emails will be sent. (Email Alert example below) |
All information entered here will appear by clicking on the tab "My travel agency,". This information is also displayed at the top right of the blue bar.
Email Alert example:
Section 'Privacy policy'
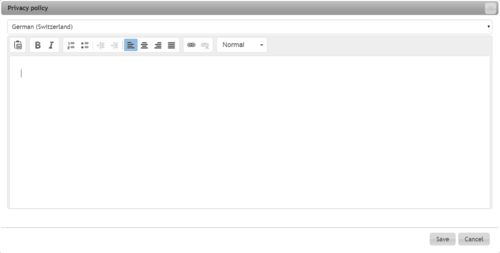
In this section, additional Privacy policy can be created and the user can be forced to re-accept the privacy policy condition within the next login. Privacy policy can be created in all different available language preferences.
The klick on "Add new" will display a Editor in which new conditions can be created.
Important:The privacy policy will be shown after the general Umbrella Tenzing Faces policy.
Section 'CSX Webservice'
| Field | Description |
|---|---|
| WS App | Abot or Tenzing |
| User ID | Amadeus User ID |
| Password | Password |
| Accesspoint | Amadeus WSAP |
| Office ID | Insert Office ID |
| Org. ID | Insert the ID of the organization
By clicking on <Test Login> the connection to Amadeus can be tested |
| Publish passport | The Passport data
|
| Publish mobile-no. | The mobile number
|
Section 'AETM'
| Field | Description |
|---|---|
| User name | Interface name to Amadeus Profile Link |
| Password | Password
By clicking on <test login> the connection to AeTM Profile Link can be tested |
Section 'Galileo WS'
| Field | Description |
|---|---|
| User name | Galileo PCC e.g. PCC7E1N |
| Host Access Profile | Galileo HAP e.g. DynGalileoProd_7E1N |
| PCC | Falileo Pseudo City Code. e.g. 7E1N |
| Password | Password
By clicking on <test login> the connection to Galileo can be tested |
| Use Travelscreen | Activation of Travelscreen useage |
Section 'Cytric'
| Field | Description |
|---|---|
| Client ID | Client ID name of Cytirc |
| Username | Cytric system |
| Password | Password
By clicking on <test login> the connection to Cytric can be tested |
Section 'umbrella.net'
| Field | Description |
|---|---|
| Client ID | umbrella.net Client ID (Mandanten ID) |
| URL | relevant target URL for umbrella.net |
Setup and configuration for umbrella.net can be found in the online documentation .
Section 'Custom Field definitions'
On this page, additional fields can be defined, which will appear on the profiles depending on the selected type of profile. General, preferences, your team, travel documents and administration can be selected. In addition, new sections can be defined with a unique label. This selection determines, in which sections the defined field appear on the profiles.
| Field | Description | ||||||
|---|---|---|---|---|---|---|---|
| Label | This is the title of the determined field | ||||||
| Mandate | The following obligations can be selected: O = optional, M = mandatory, CS = company-specific. | ||||||
| R/W ( visibilitiy) |
| ||||||
| CSX Prefix | Here the Amadeus prefix is entered. Possible prefixes AP, APE, OS, SR, RM, RC, RX, RMC (Categorie Remarks), FK, RIR, ES, OP, FT) | ||||||
| AeTM | The index of AeTM Custom Fields | ||||||
| Field | Possible values are INPUT (regular, single-line text field) and TEXTAREA (multiline text field) | ||||||
| Validation | The generic field validation rule can be specified. The format is basically a "regular expression". Some typical examples are:
In addition, a list of possible values can be defined. For this purpose a semicolon-separated list is entered, with leading string'[L'. Examples
The first example is written as a field value 'Sedan', the second 'SED' | ||||||
| Profile Type | A distinction is made between Traveller and Company, T (Traveller) and C (Company) for the profile type on which the profile box appears |
Section 'Custom Publish Actions'
| Field | Description |
|---|---|
| Action | Select COPY or FILTER for your action |
| Type of Profile | A distinction is made between Traveller and Company, T (Traveller) and C (Company). Select the Type of Profile on which the profile box appears. |
| Source | Indicate the source respectively the corresponding filter. |
| Target | Indicate the target or insert a free text if using the filter function. |
The source for the COPY function company data profile can be found under Company The source for the COPY function Traveller data is visible at line 1 in the CSV file. If 0-n lists (FQTV or passports) are copied, either an index (passports0, passports1) can be used, or use the index placeholder '#' (# passports). The latter then copies all existing indexes.
FILTER examples can be found under profile Traveller | and profile Company
Import/export generic setup
(available with the next release, planed 15th October 15)
A export and/or import from the agency generic setup of custom field definitions and custom publish actions in a XML schema file. The XML file can be used for a upload to a existing agency.
Workflows / Processes
New fields can be added just by clicking on "Add New" in the field definition section. At the bottom of the field definitons section, a new section can be added by clicking on "Add New".
The publish actions can be added by clicking on "Add New".

